ShopDreamUp AI ArtDreamUp
Deviation Actions


![[KICKASS] Hit Girl's double blades staff](https://images-wixmp-ed30a86b8c4ca887773594c2.wixmp.com/f/186648fe-7288-4d3b-83ca-a7090b04c02c/d7hfchc-22e07639-18c2-48fc-bd58-c3d899322018.jpg/v1/crop/w_184,h_184,x_0,y_23,scl_0.19166666666667,q_70,strp/_kickass__hit_girl_s_double_blades_staff_by_dj3r0m_d7hfchc-92s-2x.jpg?token=eyJ0eXAiOiJKV1QiLCJhbGciOiJIUzI1NiJ9.eyJzdWIiOiJ1cm46YXBwOjdlMGQxODg5ODIyNjQzNzNhNWYwZDQxNWVhMGQyNmUwIiwiaXNzIjoidXJuOmFwcDo3ZTBkMTg4OTgyMjY0MzczYTVmMGQ0MTVlYTBkMjZlMCIsIm9iaiI6W1t7ImhlaWdodCI6Ijw9MTQ0MCIsInBhdGgiOiJcL2ZcLzE4NjY0OGZlLTcyODgtNGQzYi04M2NhLWE3MDkwYjA0YzAyY1wvZDdoZmNoYy0yMmUwNzYzOS0xOGMyLTQ4ZmMtYmQ1OC1jM2Q4OTkzMjIwMTguanBnIiwid2lkdGgiOiI8PTk2MCJ9XV0sImF1ZCI6WyJ1cm46c2VydmljZTppbWFnZS5vcGVyYXRpb25zIl19.MqUwkUG8osQRjtGHzMTF-4_DiVBQZt_4VBSxdGTbPTc)
![[KICKASS] Hit Girl's double blades staff](https://images-wixmp-ed30a86b8c4ca887773594c2.wixmp.com/f/186648fe-7288-4d3b-83ca-a7090b04c02c/d7hfchc-22e07639-18c2-48fc-bd58-c3d899322018.jpg/v1/crop/w_92,h_92,x_0,y_12,scl_0.095833333333333,q_70,strp/_kickass__hit_girl_s_double_blades_staff_by_dj3r0m_d7hfchc-92s.jpg?token=eyJ0eXAiOiJKV1QiLCJhbGciOiJIUzI1NiJ9.eyJzdWIiOiJ1cm46YXBwOjdlMGQxODg5ODIyNjQzNzNhNWYwZDQxNWVhMGQyNmUwIiwiaXNzIjoidXJuOmFwcDo3ZTBkMTg4OTgyMjY0MzczYTVmMGQ0MTVlYTBkMjZlMCIsIm9iaiI6W1t7ImhlaWdodCI6Ijw9MTQ0MCIsInBhdGgiOiJcL2ZcLzE4NjY0OGZlLTcyODgtNGQzYi04M2NhLWE3MDkwYjA0YzAyY1wvZDdoZmNoYy0yMmUwNzYzOS0xOGMyLTQ4ZmMtYmQ1OC1jM2Q4OTkzMjIwMTguanBnIiwid2lkdGgiOiI8PTk2MCJ9XV0sImF1ZCI6WyJ1cm46c2VydmljZTppbWFnZS5vcGVyYXRpb25zIl19.MqUwkUG8osQRjtGHzMTF-4_DiVBQZt_4VBSxdGTbPTc)
![[ONE PIECE] Zoro's katanas](https://images-wixmp-ed30a86b8c4ca887773594c2.wixmp.com/f/186648fe-7288-4d3b-83ca-a7090b04c02c/d78zlto-43316c85-7ed0-4ad5-89ba-dabccb1836e9.jpg/v1/crop/w_184,h_184,x_15,y_0,scl_0.15333333333333,q_70,strp/_one_piece__zoro_s_katanas_by_dj3r0m_d78zlto-92s-2x.jpg?token=eyJ0eXAiOiJKV1QiLCJhbGciOiJIUzI1NiJ9.eyJzdWIiOiJ1cm46YXBwOjdlMGQxODg5ODIyNjQzNzNhNWYwZDQxNWVhMGQyNmUwIiwiaXNzIjoidXJuOmFwcDo3ZTBkMTg4OTgyMjY0MzczYTVmMGQ0MTVlYTBkMjZlMCIsIm9iaiI6W1t7ImhlaWdodCI6Ijw9MTIwMCIsInBhdGgiOiJcL2ZcLzE4NjY0OGZlLTcyODgtNGQzYi04M2NhLWE3MDkwYjA0YzAyY1wvZDc4emx0by00MzMxNmM4NS03ZWQwLTRhZDUtODliYS1kYWJjY2IxODM2ZTkuanBnIiwid2lkdGgiOiI8PTE2MDAifV1dLCJhdWQiOlsidXJuOnNlcnZpY2U6aW1hZ2Uub3BlcmF0aW9ucyJdfQ.afy2R-UotxzwlL1RYc9z2qm6FZjqhl0hvXVAh8QeVYo)
![[ONE PIECE] Zoro's katanas](https://images-wixmp-ed30a86b8c4ca887773594c2.wixmp.com/f/186648fe-7288-4d3b-83ca-a7090b04c02c/d78zlto-43316c85-7ed0-4ad5-89ba-dabccb1836e9.jpg/v1/crop/w_92,h_92,x_8,y_0,scl_0.076666666666667,q_70,strp/_one_piece__zoro_s_katanas_by_dj3r0m_d78zlto-92s.jpg?token=eyJ0eXAiOiJKV1QiLCJhbGciOiJIUzI1NiJ9.eyJzdWIiOiJ1cm46YXBwOjdlMGQxODg5ODIyNjQzNzNhNWYwZDQxNWVhMGQyNmUwIiwiaXNzIjoidXJuOmFwcDo3ZTBkMTg4OTgyMjY0MzczYTVmMGQ0MTVlYTBkMjZlMCIsIm9iaiI6W1t7ImhlaWdodCI6Ijw9MTIwMCIsInBhdGgiOiJcL2ZcLzE4NjY0OGZlLTcyODgtNGQzYi04M2NhLWE3MDkwYjA0YzAyY1wvZDc4emx0by00MzMxNmM4NS03ZWQwLTRhZDUtODliYS1kYWJjY2IxODM2ZTkuanBnIiwid2lkdGgiOiI8PTE2MDAifV1dLCJhdWQiOlsidXJuOnNlcnZpY2U6aW1hZ2Uub3BlcmF0aW9ucyJdfQ.afy2R-UotxzwlL1RYc9z2qm6FZjqhl0hvXVAh8QeVYo)


Description
EDIT 8/9/07-----Go check out the video version on Youtube ------> [link]
Leave any comments or suggestions on DA please
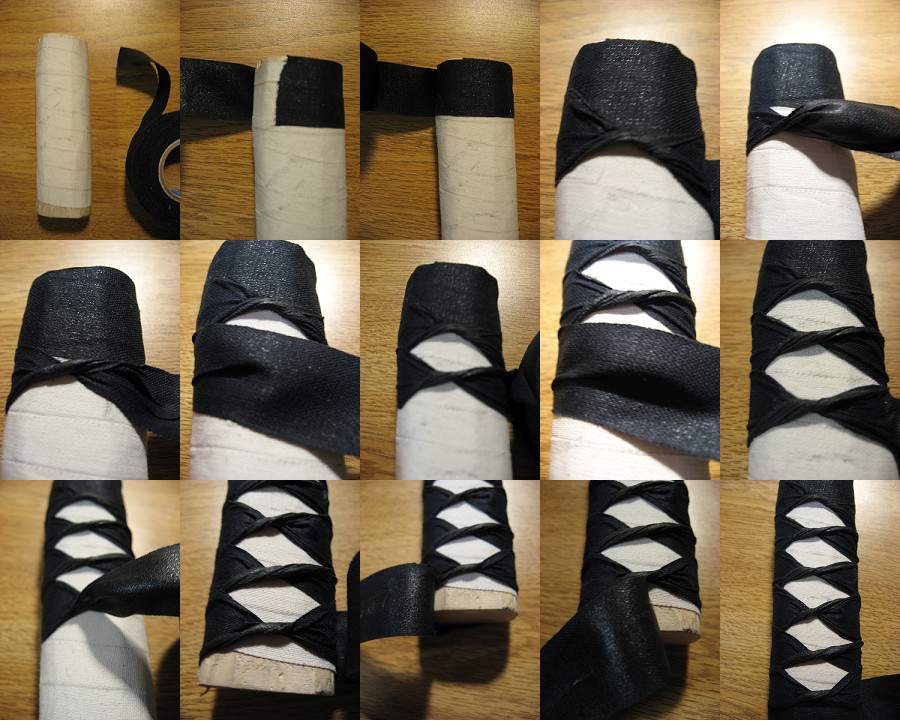
Just a fair warning, this is not at all a traditional way of tsukamaki/handle wrapping, nor is it a substitute. This is simply to give the right look for prop and cosplay weapons.
Alright, heres the how to that goes with the pictures that are up. Basically, i use 1 inch thick hockey tape that can be found at a sport shop or maybe a hardware store. you can use any type of fabric too, it'll just be a little harder because it won't have the tape side so it won't stick, and you'll have to hot glue the ends down. there are two ways to do this, the one i use is easiest. start off with wrapping your base layer of tape, just in a spiral going down. i used white for the pictures for clarity, but i think you need to use black if i remember correctly. once that is done, you start with the diamond layer. start off with just a single thickness wrap at the top, as shown. then your first twist goes right at the bottom of this. for the twist, all you are doing is twisting the tape 360 degrees around to create the diamond pattern and create a bump for grip. it'll take some practice to get the twist where you want it, but its not hard. i've shown it in two steps, each at 180 degrees around. this twist will leave a little bit of the sticky side up on purpose, mostly for grip, and it will fade away the more you handle the sword. so, the first twist goes right at the edge of the first wrap, and the same applies for the other side. then, continue this pattern all the way down in a spiral like your base wrap. it basically goes, twist/flat/twist/flat/twist/flat so that the sides are completely covered and only the "diamond" of the base wrap is exposed on both sides. again, this will take some practice, but its not too hard. now when you get to the bottom, you are going to end it similar to how it started. do the last twist of both sides almost to the bottom, about 1 inch away (the thickness of the tape) and then just flat wrap it like you did the top so that the top edge covers the remaining base wrap and butts up to the last twist. you can also cover the bottom of the wood handle with tape first and then do the last step, or vice versa. or just clip the tape at the bottom if it extends past the handle and leave the wood bare. and thats about it for the wrap, the pictures should explain the rest.
Leave any comments or suggestions on DA please
Just a fair warning, this is not at all a traditional way of tsukamaki/handle wrapping, nor is it a substitute. This is simply to give the right look for prop and cosplay weapons.
Alright, heres the how to that goes with the pictures that are up. Basically, i use 1 inch thick hockey tape that can be found at a sport shop or maybe a hardware store. you can use any type of fabric too, it'll just be a little harder because it won't have the tape side so it won't stick, and you'll have to hot glue the ends down. there are two ways to do this, the one i use is easiest. start off with wrapping your base layer of tape, just in a spiral going down. i used white for the pictures for clarity, but i think you need to use black if i remember correctly. once that is done, you start with the diamond layer. start off with just a single thickness wrap at the top, as shown. then your first twist goes right at the bottom of this. for the twist, all you are doing is twisting the tape 360 degrees around to create the diamond pattern and create a bump for grip. it'll take some practice to get the twist where you want it, but its not hard. i've shown it in two steps, each at 180 degrees around. this twist will leave a little bit of the sticky side up on purpose, mostly for grip, and it will fade away the more you handle the sword. so, the first twist goes right at the edge of the first wrap, and the same applies for the other side. then, continue this pattern all the way down in a spiral like your base wrap. it basically goes, twist/flat/twist/flat/twist/flat so that the sides are completely covered and only the "diamond" of the base wrap is exposed on both sides. again, this will take some practice, but its not too hard. now when you get to the bottom, you are going to end it similar to how it started. do the last twist of both sides almost to the bottom, about 1 inch away (the thickness of the tape) and then just flat wrap it like you did the top so that the top edge covers the remaining base wrap and butts up to the last twist. you can also cover the bottom of the wood handle with tape first and then do the last step, or vice versa. or just clip the tape at the bottom if it extends past the handle and leave the wood bare. and thats about it for the wrap, the pictures should explain the rest.
Image size
900x721px 217.21 KB
© 2007 - 2024 piratecaptain
Comments77
Join the community to add your comment. Already a deviant? Log In
So glad I found this! This was super helpful!! Thank you!!