ShopDreamUp AI ArtDreamUp
Deviation Actions


Suggested Deviants


Suggested Collections


You Might Like…


Description
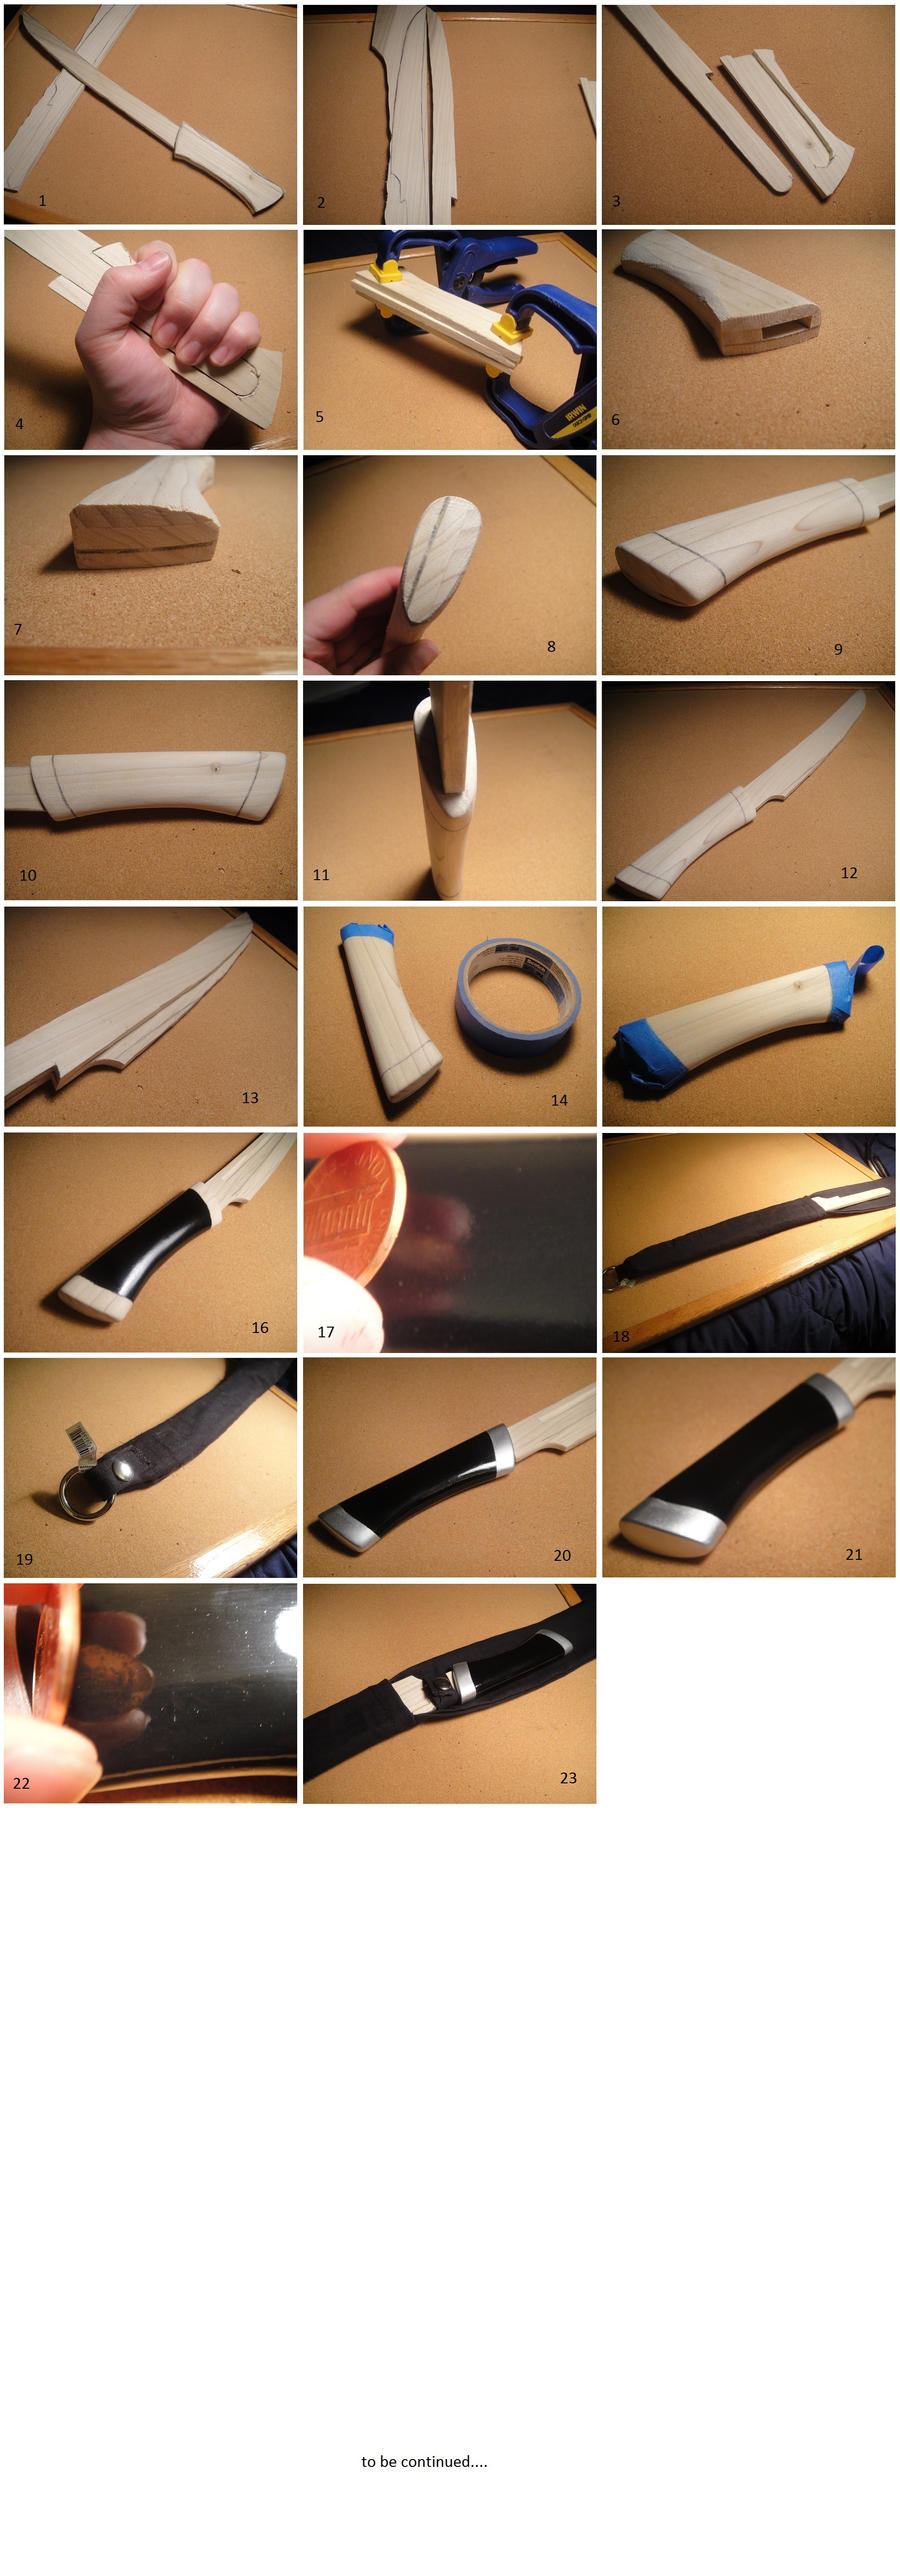
So this is another project idea for my "soon to open" shop. Prototypes like this help me to refine an idea, but also will be sold cheaply once I've finished with it. If this looks like something you'd buy or you're interested in purchasing the prototype, let me know!!
The basic idea here is to make a knife fit for battle. I'm working on a chest harness as well that will hold 6 of these for a LARP character of mine. These will be arranged on the harness so a knife is always at hand regardless of stance/position. It will be much cooler than it sounds, promise.
1. The look I'm going for is something between a wakizashi, the knives that Legolas uses in the movies, and the knife that Aragorn has. One handed.
2. I'm making a couple different blade styles so that a buyer could customize the look of the knife a little bit. Personally, I like the wider blade the best.
3. Simple set up, there is a basic handle which will accept any of the blade tangs. Just pick a blade and glue it in. You can see how the handle is made from three pieces, two sides and a "U" shape.
4. Showing the size and look of the handle in the hand.
5. I've sized the tang, now I can glue the other side of the handle on. Next step is shaping the handle down.
6. With the handle all glued up, I begin shaping the handle.
7. You can start to see the final shape.
8. The final shape of the handle ends. This shape is similar to the ones I put on my katana tsukas, but the contour throughout the handle is very different.
9. A shot of the rest of the handle contours. It's actually a very comfortable handle.
10. The design will have as an option different color "bolsters". I've marked them off in pencil to get a sense of the look, and size the bolsters to the handle.
11. A look at how the blade sits on the handle currently. This will look much better when the blade itself is shaped, but the handle comes first.
12. I cut out the second blade style to see how it would work on this handle. Personally I like it, although it may seem a little odd to others. Let me know what you think!
13. A comparison of the two blade styles. One is quite a bit wider, but they both have the same length and the same amount of curve at the back. The larger one also has that little "hook" near the handle to fit a clasp on an inverted sheath so it stays put. I'm looking to draw up one more blade design, this time a straight blade, no curve.
14. Ah yes, taping. One of the most tedious tasks to accomplish. However, needed to do this properly. The goal is to paint the middle area of the handle a "mirror black" finish, and the so called "bolster" areas a shiny silvery chrome like color. What I mean by mirror black is simply that it's a very reflective black color that has lots of depth, similar to a well lacquered katana saya.
15. Just a quick note, taping a small loop to your work can allow it to hang, and lets you hold it without painting your fingers. Just saying.
16. Stage 1 of mirror black complete! It's not done, right now it's just shiny black. Still needs a little more work. The paint isn't perfect, but it's a prototype. Not a perfect-type.
17. You can see in this shot how much is reflected in the paint as is. I hope to increase the clarity and depth much more. We'll see.
18. With the help of my lovely lady, I have created a "soft" sheath out of canvas for this knife. Another prototype to work out design flaws. It look pretty cool though. Yeah, team effort!
19. You can see here how it would attach to a belt or baldric. There will be two snaps, one on each end when it's finally done. It will also have a snap to keep the blade from falling out if worn upside down.
20. Handle is done! With a shinyprettybling finish on it too!
21. Does having two pictures of the handle in a row display how proud of it I am?
22. My so called mirror black finish. You can see the huge difference in clarity after the final finish and polish have been applied. I'm quite pleased with the final product, though I will be able to do an even better job on the next try. The only problem with this finish, however, is that it will reveal any and all flaws on your surface. Any mistakes made will show up when the light hits it, so the time spent in surface preparation is crucial.
23. A little progress shot, since the sheath and the handle are done, only the blade is left. Then it's off to market with it!
to be continued...
Image size
1841x5264px 1.97 MB
Make
SONY
Model
DSC-T90
Shutter Speed
10/400 second
Aperture
F/3.5
Focal Length
6 mm
ISO Speed
200
Date Taken
Jan 30, 2011, 1:29:18 AM
© 2011 - 2024 piratecaptain
Comments43
Join the community to add your comment. Already a deviant? Log In
Wooow! It's an amazing job, fave!